This is post number four and I’m going off topic already. This post is a technical note on how to install WordPress on a desktop PC.
After installing WordPress on my hosting service (hosted on Easily if you’re interested) I wanted a copy on my home PC as an offline backup and to generally fiddle with. As I’m likely to zap my PC soon (Vista is dead, long live Windows 7) , I’m keeping a note of how I did this.
Now that I think about it, I don’t think there is a single how to guide available. If there is I didn’t even look for it because the process was surprisingly easy. There were one or two gotchas though.
To run WordPress you need:
- Apache HTTP Server (2.2.14)
- PHP (5.2.11)
- MySQL (5.1)
The versions listed are just what happened to be up to date when I got them. For the record, I’m familiar with Apache but I’d never used PHP or MySQL before.
Install Apache
This turned out a little harder than I expected because of a ‘feature’ in Windows Vista. Unless you turn off UAC, it will not allow you to modify the httpd.conf file. Or rather it will, it just won’t have any effect. Other than that, this is just a case of downloading the installer for Windows and installing using defaults. I wanted my http://localhost/ to be the root of my website (http://www.disasterarea.org.uk), so in the httpd.conf, I fiddled the DocumentRoot:
DocumentRoot "C:/Users/Stevie/My Webpages/My Webpages"
and set some directives on the root directory (to allow imports in .shtml files and have .shtml as default index page)
<Directory "C:/Users/Stevie/My Webpages/My Webpages/">
 ... (skipped standard stuff)
Options Indexes FollowSymLinks Includes
AddType text/html .shtml
 AddHandler server-parsed .shtml
 DirectoryIndex index.shtml index.html index.php
</Directory>
A restart of Apache and my regular web pages were served locally. Or more accurately, a restart of Apache, nothing happens, some swearing, discovering the UAC feature and killing it then pages were served.
Install PHP
The PHP installer can automatically configure your Apache for you. Just select the option to setup the ‘Apache 2.2.x Module’ and point it at the conf directory of your Apache installation. After PHP is installed, it will add any necessary config to your httpd.conf.
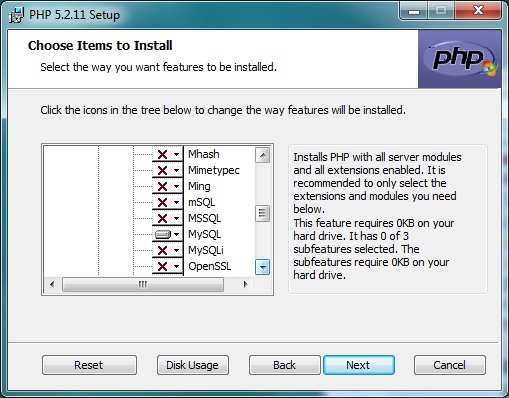
By default, no additional components are installed so you’ll need to pick MySQL from the Extensions list to install it.

Install MySQL
I used the standard installer with default options. Once it’s installed, choose to create a Standard Configuration. Choose a root password and let it do its thing.
You’ll also want to set up a user for WordPress (unless you want WordPress to connect as root admin – not advised) and a database. Open up the MySQL Command Line Client (it should be in the start menu now). Enter your root password at the prompt. Then fire in something like this:
mysql> CREATE DATABASE databasename;
Query OK, 1 row affected (0.00 sec)

mysql> GRANT ALL PRIVILEGES ON databasename.* TO "wordpressusername"@"hostname"
    -> IDENTIFIED BY "password";
Query OK, 0 rows affected (0.00 sec)
You’ve now got a new database for WordPress (called databasename), and a username and password to connect (wordpressusername / password)
Copy WordPress
At this point, you could run a standard WordPress installation using their famous 5 minute installation. However, I don’t want a fresh install. I want a copy of what’s already running on my host. So there are a couple of things to do. First, use FTP to download all the files in my blog directory from the remote host to my local machine. Second, copy the database from the live site to my local MySQL server.
I just used PHPMyAdmin on my remote host to export the database to an SQL script. Then run the script file from the command line using mysql.exe:
C:\Users\Stevie\dbbackups>mysql databasename -h localhost -u wordpressusername -p < 20091101export.sql
Enter your password and hit enter.
That’s it!
Now navigate to http://localhost/blog. You should see your WordPress blog exactly as it appears online.
Now that I’ve got this going locally, I’m free to fiddle about with it without fear of breaking the live blog. I quite fancy having a go at fiddling the layout or creating a widget.
Be First to Comment